

“Chili”, “chile”, whatever. I’m originally from Texas, so it’s “chili pepper”. ‘Nuff said.
Sooo, today our chili pepper talk has a narrow focus on five varieties that can be found consistently in chain grocery stores. If you live in a climate where the growing season is longer and farmers markets (or grocers) have access to a wide variety of peppers, check back with us or subscribe, and we’ll let you know when we focus on some of those varieties.
If for some reason you don’t have time/access to a grocer, cayenne is probably in your spice/herb shelf; it’s a great resource and hugely versatile. For example, soups and certain sauces often have just a hint of pepper, so the easy, at-hand solution is quite logical.
The variety and flavor/use range of the entire pepper family is overwhelming, with entrants from every nationality that has land in the warmer latitudes. Of course, many cold climate patio gardeners have great success growing peppers in pots during their warmer months.
Please locate thin, latex-style gloves to keep in a kitchen drawer for working with these puppies. You have no idea how long the pepper/heat can stay on your fingers! Soap will not remove it, but warm water soak + soap will help.
Capsaicin, the naturally occurring compound in peppers that makes them hot, is believed to be good for your health, as long as you don’t have gut problems that make them irritable to you. If that is the case, try to make sure it’s the peppers themselves and not garlic or onion (alliums), which are often in the same dishes. Lots of people have allium intolerances or even allergies that go unidentified for years. Generally, people who love to cook are highly interested in their food not causing discomfort for their loved ones or guests either. We are dedicated to providing awesome allium substitutes that will keep your umami buds happy.
According to Wikipedia, in 2019, the world’s production of raw green chili peppers amounted to 38 million tons, with China producing half.
Here’s the lineup for our easy-to-find peppers. We have a link below that will tell you much of what you might want to know about Scoville units.
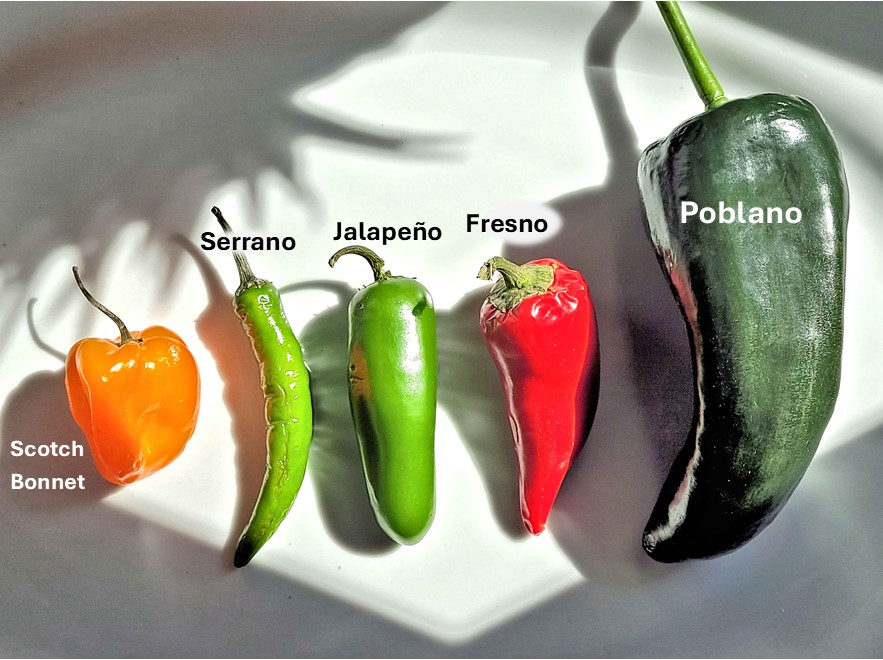
Poblano Pepper
(1,000 – 1,500 Scoville units = mild)
The poblano is a favorite of mine, because it can be used both as a seasoning and as a vehicle, similar to some other peppers. Because it is on the large side, it can be stuffed with meats, cheeses and veggies. It originated in the Mexican state of Puebla, which is about 86 miles southeast of Mexico City, and a resident of Puebla is called a Poblano! When preparing, please be forgiving of the lovely Poblano which is tender and sweet when well cooked, because it can be, unpredictably, a bit hot. Usually, as a cook, we don’t want surprises, but you’ll find if you do get surprised, it will be easy enough to live with. Maybe just a raised eyebrow.
Try to buy them when the skin is plump, not wrinkly, although in a braise, the flavor would come through just fine even if a bit wrinkly and dehydrated. They will also have a translucent skin to remove when cooked, which is easily done with a few-seconds dunk in very hot or boiling water then rubbing it off with a dry towel, then another rinse. Lately I haven’t felt the need to do this step, but do as the spirit moves you.
Dish to Try: Stuffed Poblano Boats
I like the control you get with splitting the peppers and serving them boat-style. You can choose whether to pile them high with filling or less so and if someone at the table unexpectedly doesn’t like the pepper heat or taste, they can just eat the filling (yeah, I’m thinking KIDS).
It’s good to make a bit too much filling, because it would be great in a casserole, taco, quesadilla or rice bowl a few days later. Preparing the filling one to four days in advance is great for letting the flavors blend.
So, what we’re doing here is really making a taco filling and optionally adding the other inputs mentioned below. I will soon write a series of posts strictly on taco fillings, but for this brief entry, just taste as it cooks and adjust to your instinct. Target about ½ cup per poblano-half. This will be a bit much, but it makes a nice presentation to let it spill over a bit on to the plate. Sides ideas: beans and/or rice, cole slaw, crispy roasted potato chunks.
Serves 4 as main course
| Ingredient | Quantity |
| Poblano peppers | 4 |
| Protein of choice* | 2 ½ to 4 cups, depending on number of other inputs below. It assumes each poblano-half takes ½ cup of filling. Prep process below in step 1. |
| Tomatoes, minced | ½ cup |
| Corn, optional | ½ cup (if you have time, skillet-sear it lightly first) |
| Onion, minced, optional | ¼ cup (seared a bit – many people don’t like raw onion) |
Other nice additions:
Cheese, grated ** 1 cup minimum – half mixed in, half for topping
Cilantro, garnish, cut up
Extremely optional:
- Rice, white (I’d rather have it as a side dish, leaving poblano filling more protein-dense
- Mushrooms, pan seared in butter, fine chop, 1 Tbsp per poblano-half
1. Prepare your protein, if it is not already done, and mix together other chosen inputs.
If you already have your own favorite taco filler, skip to #2, otherwise here’s our suggestion:
a. Brown 1 lb ground beef or turkey (suggest 85% or 90% lean). Sprinkle over browned meat in pan with chili powder (thoroughly), cumin (about half as much), lime (1, fresh), paprika and celery salt (both a lite sprinkle). This combo should be flavorful and stand on its own.
b. Add a few tablespoons of water or V8. If there is no fat at all in pan, add a little olive oil or bacon drippings (keep some in the freezer!). The flavor clings extra-well to the meat if you now sprinkle a bit of wheat or rice flour over all, stir well and cook it in. Add a bit more water or V8 if needed. Stir and cook on medium heat until just the right amount of moisture is left. You want it to hold together a bit so a nice combo of filling and pepper stays on the fork.
c. Hold warm while peppers are roasting.
2. Roast split poblanos in oven or air fryer at 350° for 10 minutes. Stovetop skillet is possible if you have good luck controlling heat: you don’t want the peppers to cook more on the bottom than elsewhere.
3. Fill the poblanos to the desired amount, top with cheese and cook another 5 minutes, to bring everything together and melt the cheese a bit. You could broil ever so briefly to fully melt cheese, but maybe not if using Cotija – it doesn’t really melt, so why try. Sprinkle with minced cilantro and have a bottle of Cholula or Louisiana Hot Sauce on the table, in case you have some serious Pepper Freaks.
* Lean ground or shredded beef, turkey, chicken or goat, pinto or black beans, quinoa (dish may be mushier, tho), mushrooms (pre-cooked), cauliflower, shrimp. I don’t recommend white fish; it’s great for tacos, but not here.
** Shredded Colby/Jack, mild cheddar or crumbled Cotija (my favorite)
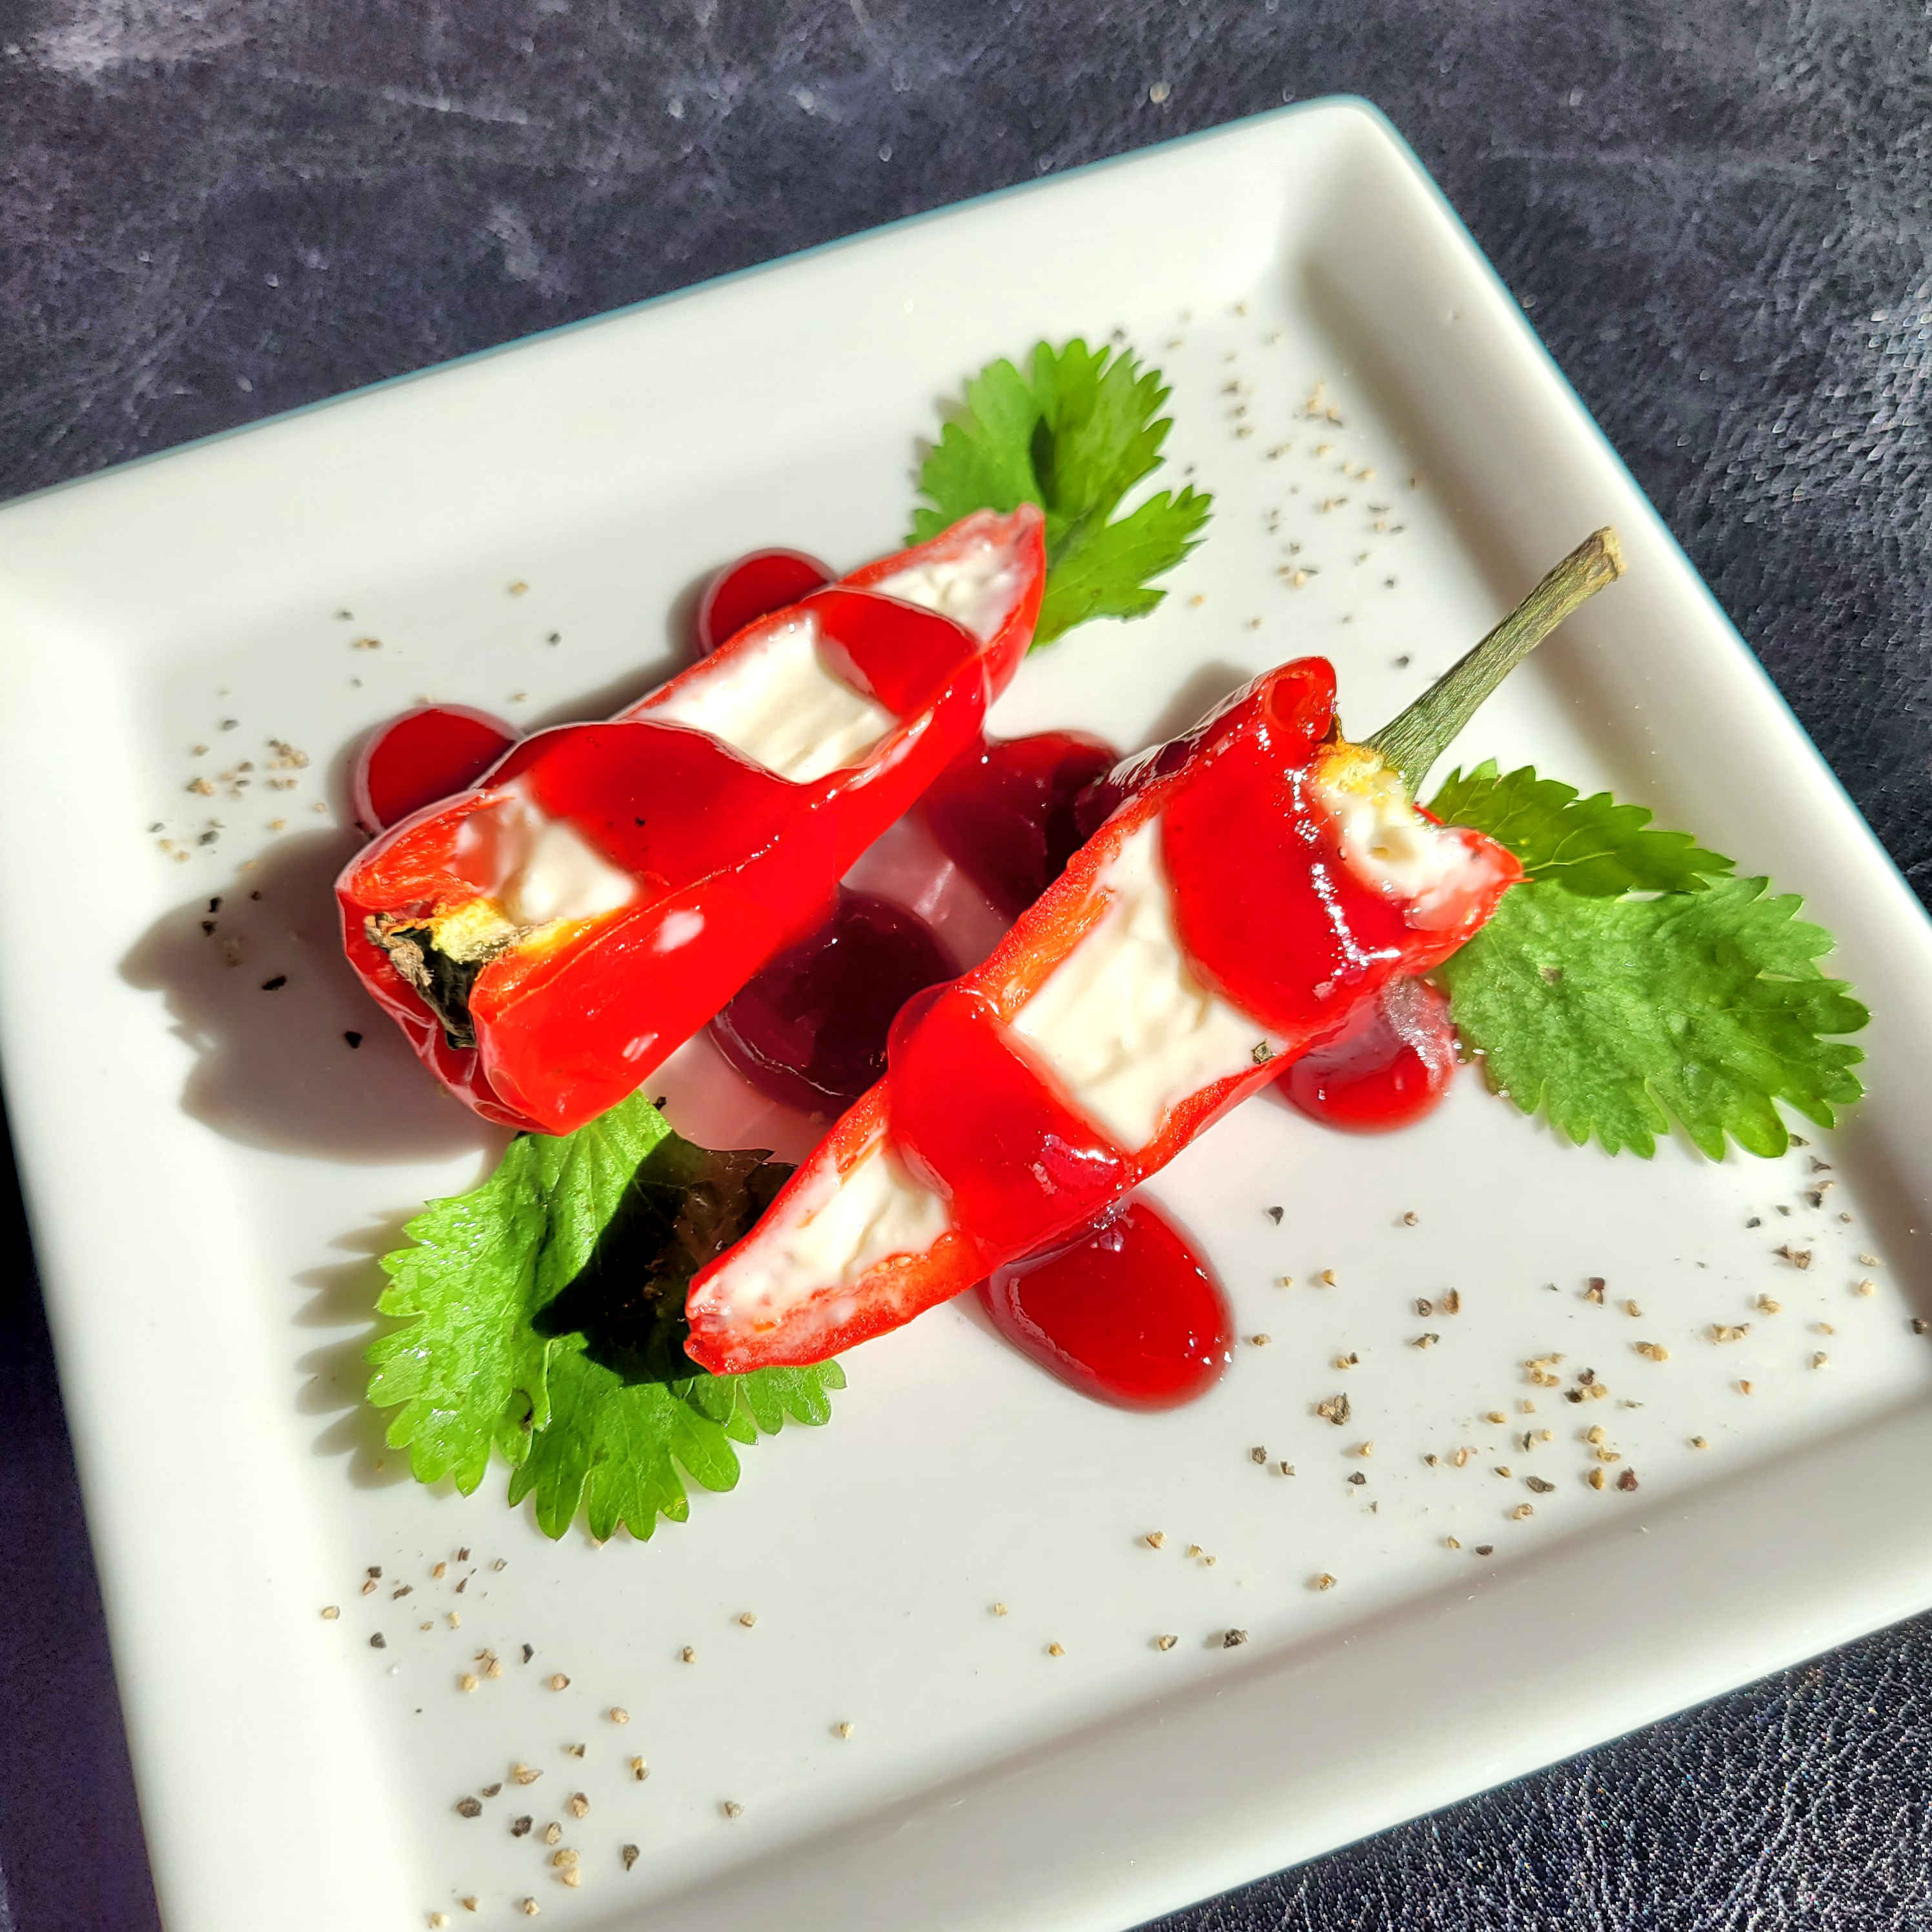
Fresno Pepper
(2,500 – 10,000 Scoville units)
Just because it’s red, it looks super hot, but it is not, necessarily! This is the famous base for the much-loved Sriracha sauce. I know because, as an allium-allergic person, I had to make my own. The store bought versions all contain garlic.
According to Wikipedia, The Fresno chili was developed and released for commercial cultivation by Clarence Brown Hamlin in 1952. Hamlin named the pepper “Fresno” in honor of Fresno, California. They are grown throughout California, specifically in the San Joaquin Valley.
Fresno Appetizer : Jam Drizzle Cheese Stuffed Peppers
Goodness, this is easy and so damn delicious. People will kick themselves, wondering why they didn’t know about this easy app sooner. Always with chilis, use your thin gloves to de-seed.
| Ingredient | Quantity |
| Fresno peppers | 2 per person = 4 pieces |
| Cream cheese, room temp | ½ oz (1 Tbsp) per pepper-half. More or less depending on pepper size. |
| Raspberry or plum jam (not Asian) | 1 Tbsp per pepper-half + more for garnishing |
Do simple arithmetic to upsize for the number of people you have. You can prep all the way through Step 5 as much as several days ahead: refrigerate, but let them come to room temp for about an hour before proceeding.
1. Preheat a skillet at low temp; this helps create nice, even heat. To pick a skillet size, eyeball about how many peppers you’re fixing, and remember they will be cut in half. You don’t have to worry much about crowding because they will not be giving off any liquid. Turn up heat to medium when you’re ready to start the prep.
2. Using gloves and a sharp knife, cut peppers in half lengthwise. Scoop out seeds and membrane. A grapefruit spoon works nicely, if you have it. Sprinkle insides lightly with fine sea salt.
3. Know your skillet – if you think the peppers even might stick, give it an oil spray. Arrange peppers in the skillet, cut-side up. Heat to medium and let them ‘roast’ for about 10 minutes. The flavor will be better if they are pretty well cooked, but you don’t want mush.
4. Remove skillet from heat and allow to cool until peppers can be handled. If you have an oven-proof serving plate, move the peppers to it.
5. As soon as cool enough to handle (just a couple of minutes), fill each pepper-half with cream cheese.
6. Heat in medium-slow oven, 300° for about 10 minutes. OR, if you left them in the skillet you can heat them, covered, on the stove top. Either way, check them a time or two to make sure they’re not sizzling. You just want the cream cheese heated through, not to turn soupy. These are finger food.
7. Eyeball about 1 Tbsp jam for each pepper half, and mix with a bit of warm water to loosen it up, using the back of a fork. Not so much water that it gets runny, and know that some jams are looser than others, so use your noggin. Nuke this to warm through just before serving.
8. Remove the peppers to a serving plate (warm if possible) and spoon a good dollop of raspberry jam sauce on each. Encourage quick consumption; they are best while still warm. Garnishing with a bit of anything green is lovely – especially cilantro, but a bit of shredded romaine would work great.
Jalapeño Pepper
(4,000 – 8,500 Scoville units)
These suckers are HOT when eaten raw. Tame them by boiling or pickling, but you’ll get little distance from the holy-crap-o-meter. You’ll often find them raw in Thai and Vietnamese food, usually a thin slice floating on a soup or in a small bunch on the plate you get with Phō, along with bean sprouts and Thai basil. Be especially watchful about what you touch if you wear contacts, need to feed a baby, or even prepare dog food. It’s kind of funny to read about, but you really would feel horrible if your little child experienced this. Save that for your drunk friends, ha.
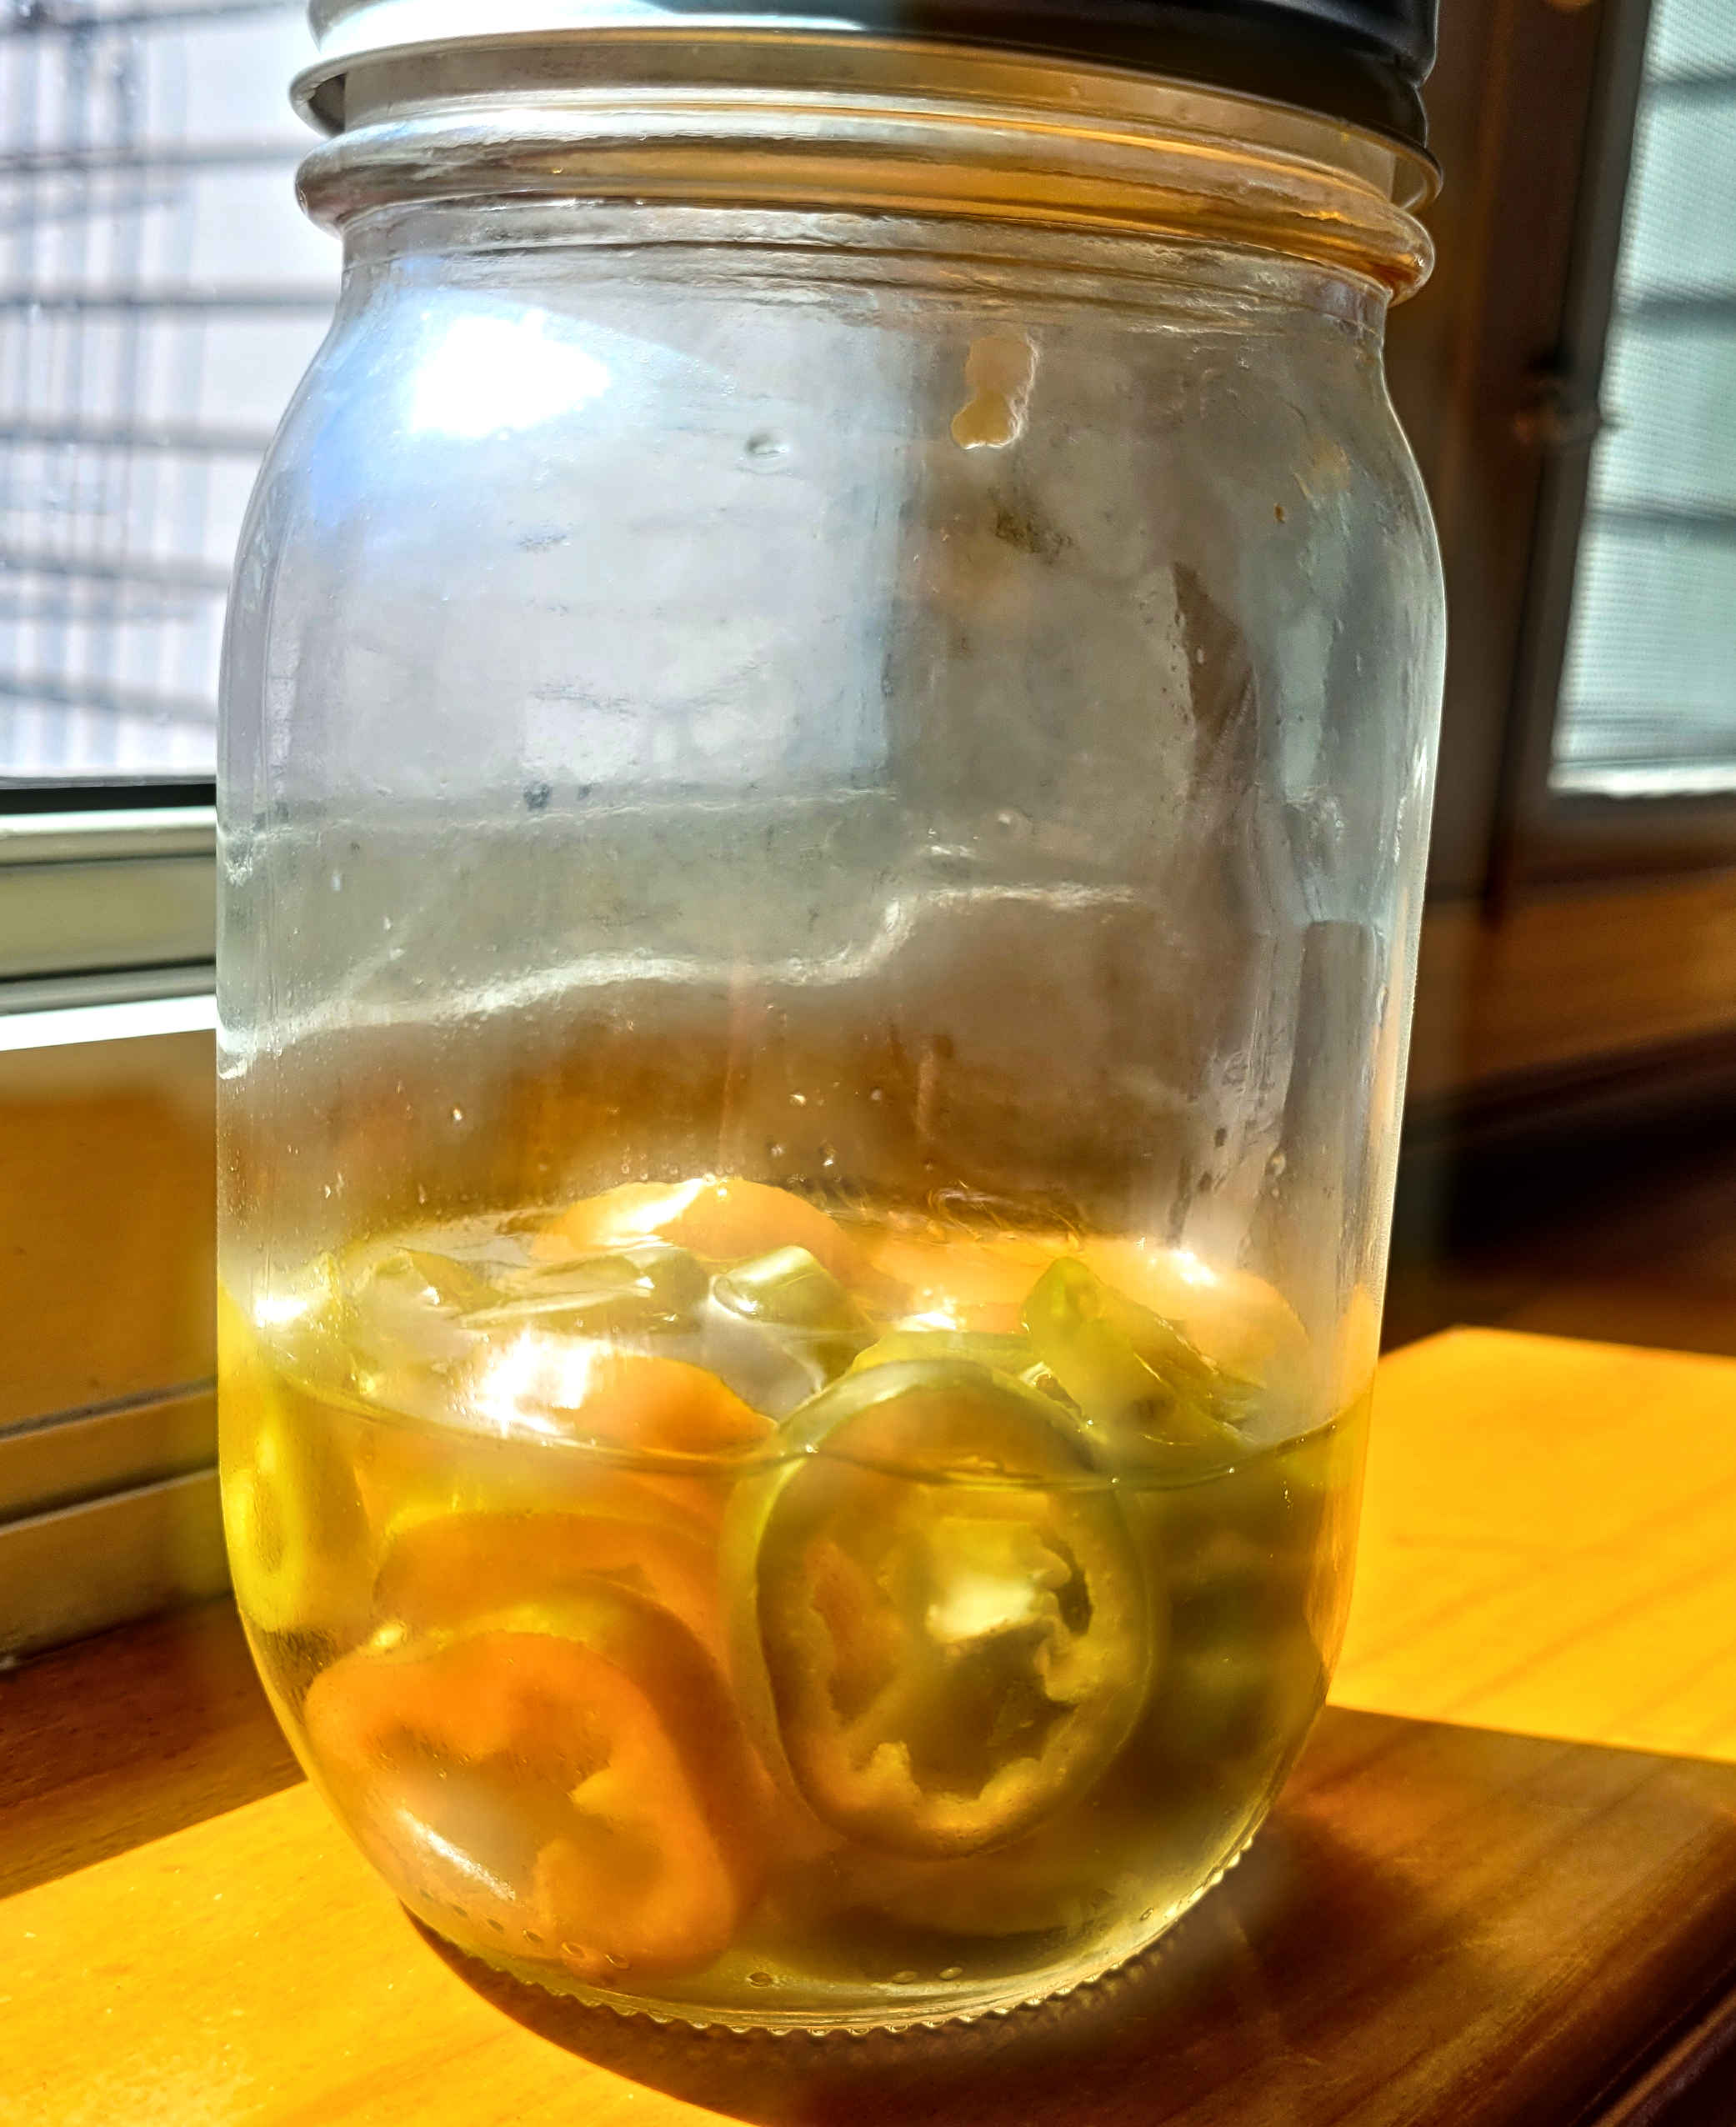
Housemade Pickled Jalapeños
This process, as like many of my processes, can be used as a multiplier. In other words, the inputs below are multiplied by whatever quantity you want to make. Maybe you’re trying it with 2 peppers as a first-timer, or you want to put up two 16-oz Ball jars to keep in the fridge: go for it!
Kind of funny, when I was researching other opinions and ideas for this piece, I found a million questions and arguments about HOW MANY peppers go into a pint jar. Well, as you’ve come to know me, my answer is always WEIGH THE SUCKERS. Who knows how large your peppers are? Quantity makes no sense for the recipe. However, for purchasing, and since there are no high-accuracy scales in your produce department, we give an approximate count, then you can weigh them before proceeding. The other benefit is that if you want to also use some carrots or onions you can weigh them altogether with the peppers.
You can slice and freeze any unused raw pepper if you are compulsively frugal, like me.
The Process and Spec’s – targeted yield is a 16 oz jar (pint) Should be stored in glass, not plastic. The typical Ball jar is 16 oz.
| Ingredient | Quantity |
| Jalapeños | 15 * (11+ oz, whole / with stems) |
| Vinegar, white | ½ cup |
| Water | ½ cup |
| Garlic, sliced lengthwise optional | 1 clove |
| Sugar | 1 Tbsp |
| Salt | 2 tsp |
* fresh jalapenos are inexpensive; better to have a bit more than you might need. Because we strongly recommend storing these in the fridge, you don’t need to worry about whether there is air at the top of the jar.
1. Combine in saucepan the garlic (optional, I never use it), water, vinegar, sugar and salt. Bring to low boil, stirring, for 1 minute
2. Slice peppers crosswise (discard stem and tip) and pack into jar that has been pre-warmed with very hot water.
3. Ladle the pickling juices over the peppers in the jar until you’ve reached ½ inch below the top of the jar. If using a Ball canning jar, place lid on. If using other type of glass jar, leave lid off or placed loosely Let cool to almost room temperature then place in fridge.
These instructions are not intended to produce a fully shelf-stable item… store in fridge.
Serrano Peppers
(10,000 – 23,000 Scoville units)
(Wikipedia) The serrano pepper (Capsicum annuum) is a type of chili pepper that originated in the mountainous regions of the Mexican states of Puebla and Hidalgo. The name of the pepper is a reference to the mountains (sierras)of these regions.
Not to be confused with super-hot Thai chilis of a similar size, serranoes can be eaten raw, and are often pickled, such as in Giardiniera, the Italian pickled-vegetable condiment available at most grocers, in the shelf-stable Italian food section.
Serrano Simple Syrup
Super Versatile! This makes about 4 ounces (½ cup), which would last through a lot of uses, but so inexpensive you won’t feel bad if you don’t use it frequently and feel the need to discard and make a fresh batch. After it’s prepared, put a dot on your finger and taste it. It should give a pretty good zing, because remember, it’s going in dishes where it will get diluted or dispersed. If it’s too hot, make another batch of plain simple syrup and mix them together (simple syrup is equal parts water and sugar warmed on the stove for 5 minutes).
| Ingredient | Quantity |
| Serrano pepper | 1 |
| Sugar | ½ cup |
| Water | ½ cup |
1. Heat water and sugar in small pan on stovetop for exactly 5 minutes. Don’t boil – just simmer.
2. Split the serrano and optionally remove seeds. Place it in the just-made simple syrup, cover and allow to sit for between 30 minutes and 1 hour. Longer probably won’t achieve anything but if you’re busy and it sits longer, it’s okay.
3. Make sure it’s cool, then transfer to a container, preferably a squeeze bottle. Refrigerate between uses.
Suggestion: if making Pad Thai or Fried Rice, for example, hold the squeeze bottle kind of high above the skillet and make light, sweeping drizzles. Taste. You can always add more.
Usage Ideas: Fruit salad (especially melon), Pad Thai, Margarita glass rim for salting, any Asian stir fry such as Lo Mein or Fried Rice, neutral heat for Bloody Mary that avoids distinct flavors of certain hot sauces. For a great chicken-wing glaze, combine with plum jam and olive oil. Can also use in most cooking where there is both a sweet and hot element (such as BBQ sauce) to save a step.
Scotch Bonnet Pepper
(100,000 – 350,000 Scoville units !!! )
These were found originally in West Africa and the Caribbean but the name no doubt came from early explorers, because it is believed to be named after the tam o’ shanter hat. It is typically used as a seasoning ingredient in hot sauces, not as a condiment, if you follow the distinction. Because it is even hotter than a jalapeno, you just won’t see slices of a scotch bonnet floating in a soup.
Seasoning condiment recipes using Scotch Bonnets often have 15 to 25 ingredients. Those are primarily jerk variations, and you can find a ton online. For our brief look at the S.B., I’m including a process that is just an oversized handful of ingredients, and the tasks and time required are reasonable. Allow 2 or 3 hours with the chicken in the fridge to marinate in the seasonings.
Lazy Jerk Chicken
(yeah, I’m talking to YOU)
| Ingredients | Quantity |
| Chicken thighs, skinless | 4 |
| Olive oil | 1 Tbsp |
| Sour cream | 2 Tbsp |
| Mayo | 2 Tbsp |
| Limes, juiced, zested | 2 |
| Scotch Bonnet | 1 |
| Worcestershire | 1 tsp |
| Cinnamon, ground | 1 tsp |
| Clove, ground | 2 shakes |
1. Mix together all ingredients except chicken
2. Rub or brush mixture on all sides of chicken, fridginate for 2 or 3 hours
3. Cook on a stovetop grill or outside at medium high heat for about 20 minutes, turning occasionally and brushing lightly with leftover marinade if they seem to be drying out. If possible, test to make sure they reach about 155° internal temperature before removing from the heat.
4. Remove from heat and cover loosely for about 10 minutes. This finishes the cooking process and is known as carryover cooking.
5. We suggest serving with lightly buttered rice combined with pineapple or mango bits. If neither is available or practical, raisins and nuts would also be good. Have plenty of beverage on hand… these can be exciting to the taste buds!

